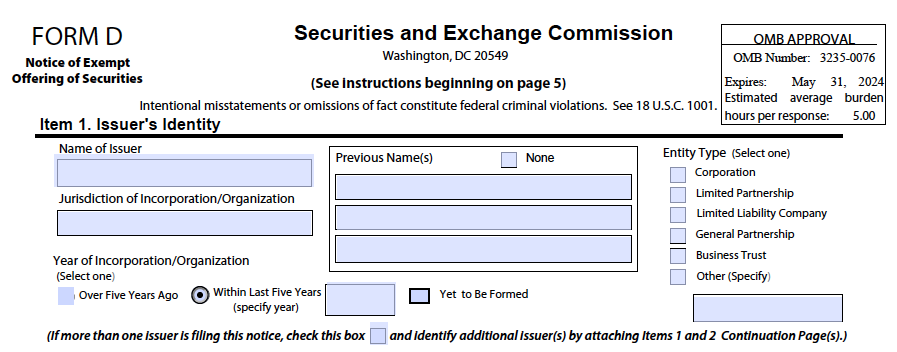
Most investors in startups buy their securities. The most common security is a share of stock. When a startup decides to issue stock, it must register its stock offering with the Securities Exchange Commission (SEC) unless there is an exemption for the offering. I’ve written about the most common exemptions, in Regulation D. That regulation requires filing a Form D with the SEC. But before you can file a Form D for your startup, you must sign up to use EDGAR, the SEC’s massive database where you make SEC filings. To file documents with EDGAR, you must register your startup, which requires obtaining a unique Central Index Key (CIK).
Getting the CIK
Getting the CIK can be a nightmare. The SEC’s computer system has a quirky UI. It can make applying for a CIK an ordeal. The SEC says to follow the steps below. We will, but I will show you how to do it without having a massive headache.

Use Chrome for the CIK Application. Don’t Use Copy and Paste or Autofill
One of the things I have learned, through hard experience, is to use Chrome to apply for a CIK. I’ll tell you more about that later, but trust me, use Chrome.
I also learned, again through hard experience, not to use copy and paste or autofill to input data. However, Chrome can remember prior inputs if you mess up and have to start an application over. It’s OK to select the memorized inputs to save time.
Apply for EDGAR Access
The first thing you have to do to get a CIK is apply for access to EDGAR. This is a two-step process. First, you must input company data and print out a document called the “Form ID.” You must sign it before a notary. Then, you go back to EDGAR and upload the Form ID. You also include a power of attorney authorizing an individual to apply for the Form D. Once you submit those documents, you will receive your CIK plus some passwords within a couple of business days.
Getting the Form ID
On the SEC’s overview page, click on the first box, “Access Form ID.” You will then see this page:
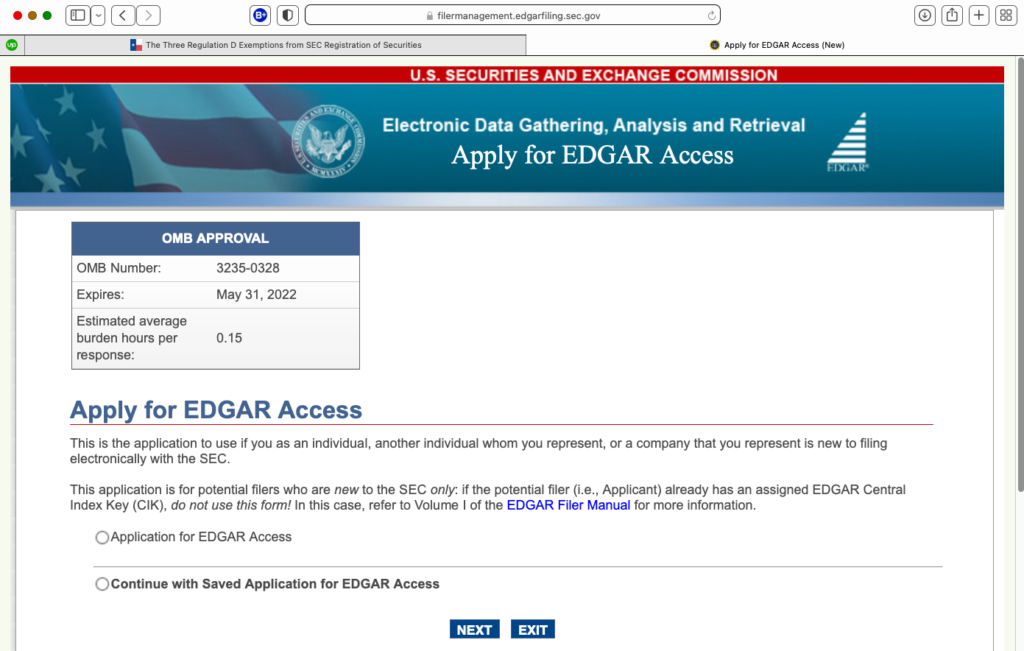
Click on the circle “Application for EDGAR Access” and then click on “Next.” You will come to this page:
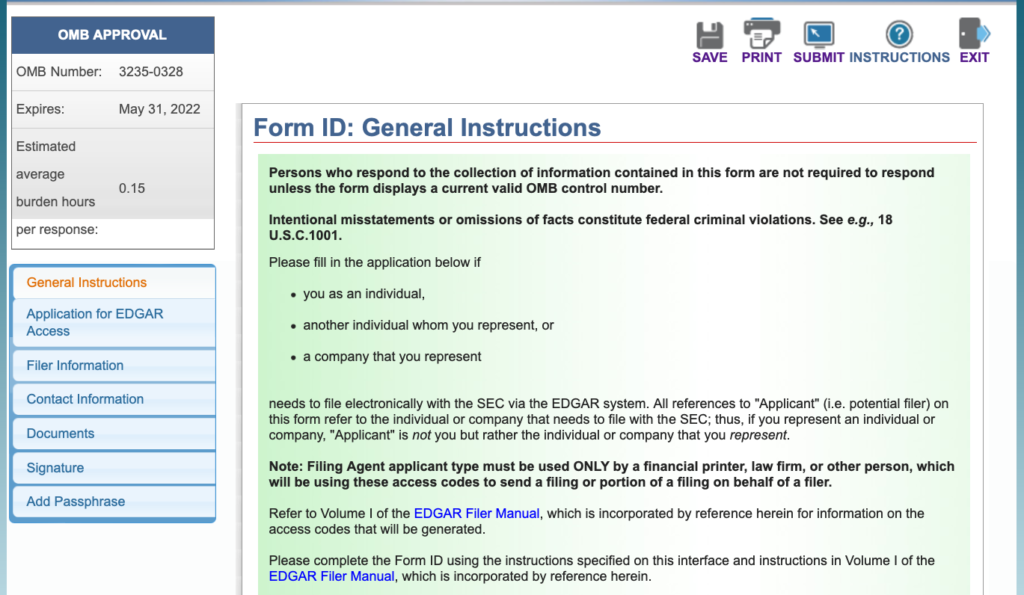
Take note of the menu on the left side of the image. If you do not see it, increase your screen resolution. At the bottom of the page, click on “Next.” On the next page, we begin data entry.
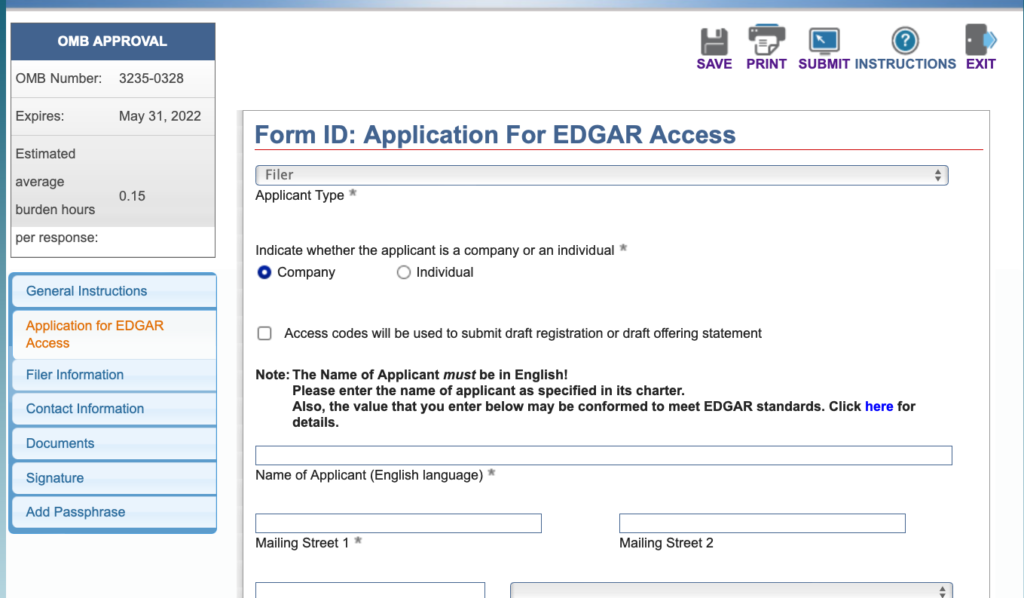
- The default value for “Applicant Type” is “Filer.” Leave it there.
- The default value for “Applicant Type” is “Company.” Leave it there.
- Input the exact name of your startup plus the rest of the information. The form is too long for a decent screenshot, but if you scroll down, you’ll see the fields.
- At the bottom, the form asks for your TIN. Your TIN is the Employer Identification Number you received when you organized your startup.
Cl.ick on “Next” and you will see this screen:
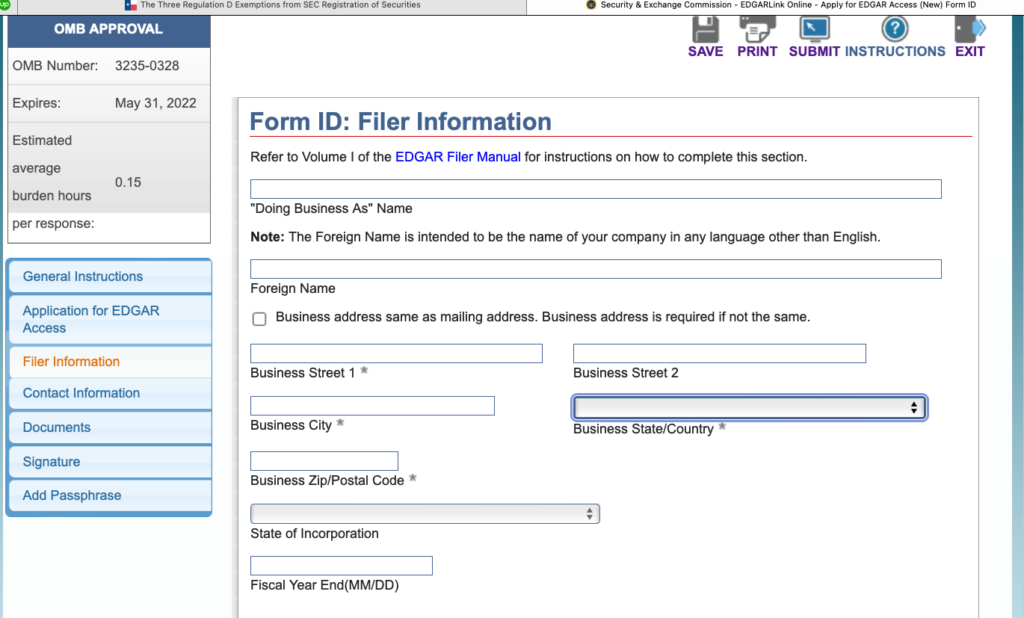
Input your dba, if you have one, and then either check the box about the business address being the same as the mailing address or fill in the info. At the bottom, input your startup’s fiscal year. This will usually be the calendar year, so you input 12/31.
Click on “Next” and you will come to a Contact Information page. There’s nothing tricky about this page, so I didn’t post an image. When you are finished, click on “Next” again. We’re getting close to finishing the initial steps to obtain a CIK.
The Form ID: Attach Documents Page
This page looks complicated, right? It really isn’t, it’s just that the UI is clunky.
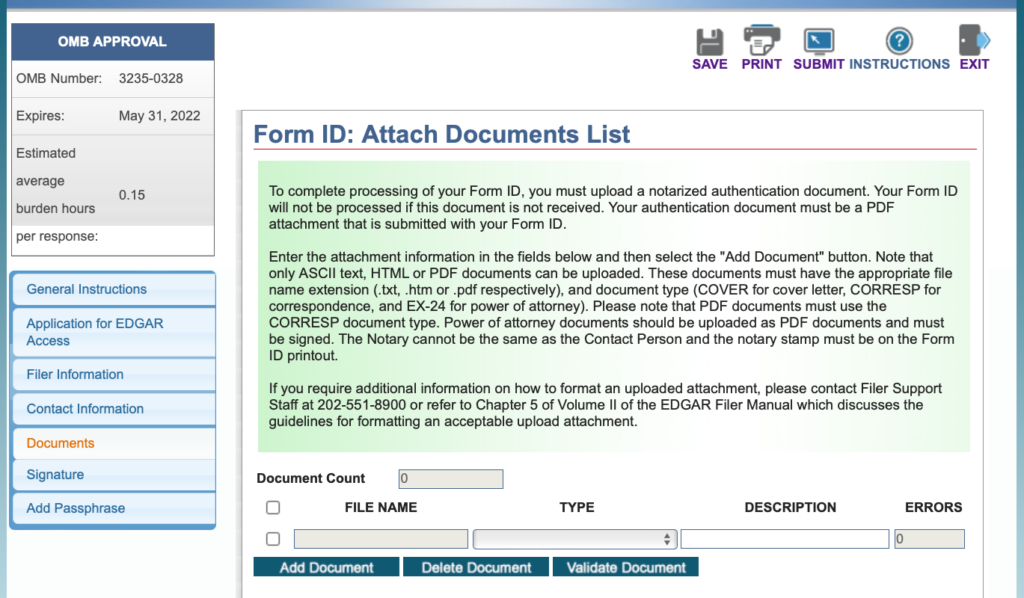
Why is the UI so clunky? This page actually should be the last page in the series. You can’t attach any documents right now. You have to take a few more steps first. So on the left side menu, click on “Signature.” You will come to this page:
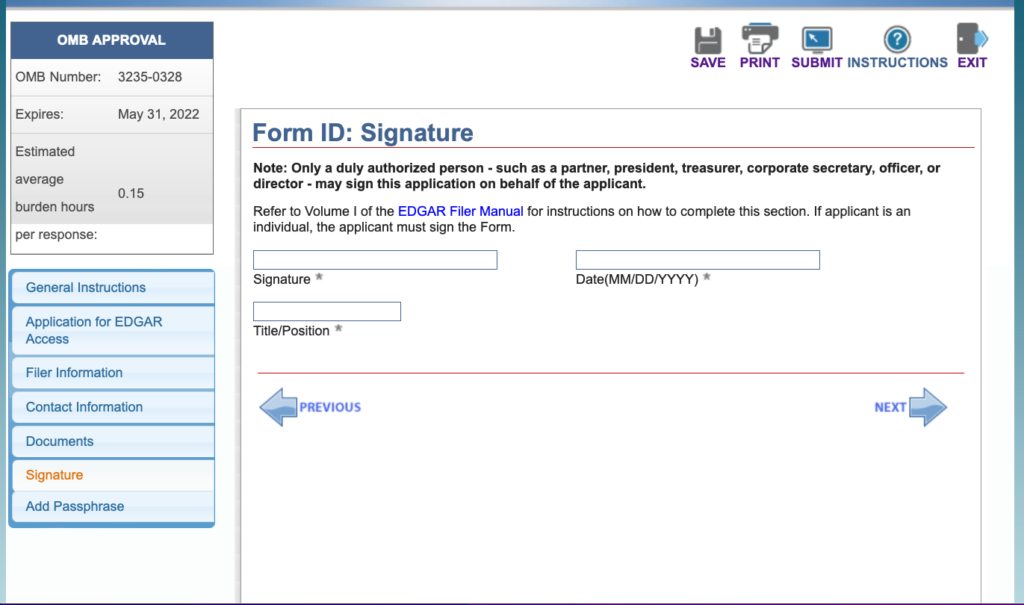
Fill in the required information, then click on “Print” in the top right menu. The Form ID will print out.
Then, click on “Save.” If you click on it, a file called ID-NEWCIK.eis will download. When you try to re-login later, you can click on that file to resume your CIK application. This might or might not work. If it doesn’t, you will receive a message that your computer does not have an application to open the file. You will have to re-input all the information up to this point when you come back (but recall that Chrome remembers your inputs).
Time to Get Back into Meatspace
The Form ID does not simply describe the company. It is also an affidavit that the information is true and correct. Therefore, you must sign the Form ID before a Notary Public. It used to be that you had to be physically with the Notary when you signed. But now online services are available. If you use an online service, be sure to ask whether the Notary can notarize for your state online.
After you have notarized the Form ID, scan it to pdf. Name the file using from eight to thirty-two lower case letters or numbers, without spaces. Do the same for the power of attorney. There’s no particular naming convention, so you can name the files whatever you want.
Doctoring the Form ID and Power of Attorney
Next, open the Form ID by left-clicking on it and selecting Chrome. When the page appears, click on the printer icon on the upper right of the screen. Pick the “Save as PDF” option, click on “Save,” change the file name so you create a new document and click on “Save.” This, I am told, gets rid of JavaScript embedded in the pdf file. Do the same thing with the power of attorney.
Uploading the Form ID and Power of Attorney to Get the CIK
Now, back to the overview page. Click on the first box, “Access Form ID,” just like before. But this time, click on the circle next to “Continue with Saved Application for EDGAR Access.” You will be prompted to upload the ID-NEWCIK.eis file we talked about earlier. If it works, you are returned to the system with info intact. If it does not work, you have to re-input. all the way up to the signature page.
Next, click on “Documents” on the left side menu. You will go back to this page.

This is what the instructions say:
Note that only ASCII text, HTML or PDF documents can be uploaded. These documents must have the appropriate file name extension (.txt, htm or .pdf respectively), and document type (COVER for cover letter, CORRESP for correspondence, and EX-24 for power of attorney). Please note that PDF documents must use the CORRESP document type.
Forget it all except for the last sentence. Then, click on “Add Document” and upload your Form ID. Do the same for your power of attorney. For “Type,” pick CORRESP for both of them. Then type in a description, for example “Form ID” and “Power of Attorney.” Click the box to the left of “FILE NAME” to select both documents.
You Might Get This Error Message
When you try to upload these filed, you might get an error message that says “Error – () filename.pdf. If you do, you must take a few more steps to make the magic work.
First, open the file again in Chrome and save them, just like we did before, but then save them with the number 1 added to the end of the file.
Then, go to the SEC’s Home page at sec.gov. Click on “Filings” close to the right side of the bar at the top of the page and from the dropdown pick “EDGAR – Information for Filers.” The bar might be blue, or it might be black.
Scroll down the page until you see Step – Apply for Edgar Access” and click on it. Scroll down the next page to “Press Here to Begin” at the bottom and click on it.
The next screen is the “Filer Management” screen. On the left side menu, click on “Apply for EDGAR Access (New).”
The next page will look familiar. Pick the option “Application for EDGAR Access” and click on Next.
The next page will look familiar, too. Click on “Documents” on the left side menu and try uploading the files you renamed with a “1” at the end. Should work. If so, you have to re-input the data from all the other pages just as we did earlier. If it does not work, call SEC filer support at (202) 551-8900.
Obtain a Passphrase
On the left side of the screen, click on “Add Passphrase.” The instructions say, “Your passphrase must be 8 characters long and must contain at least one digit and one of the following characters: @, #, *, or $.” The no-caps rule does not apply here. Don’t forget your passphrase because you will need it later.
Let’s Get It Done!
Now it is time for the Moment of Truth! At the top of the screen, click on “Submit.” If all goes well, an acknowledgement page will appear and you will receive an email confirming the submission. In a couple of business days, you will receive your CIK. I’ll tell you how to use it to get your Form D in my next post.
If you messed things up and don’t understand what went wrong, call SEC filer support at (202) 551-8900. They are smart and patient and will help you out.